
The Cinematic Power-On
Hollywood special effects don't happen all at once! To create a smooth, gradual power-on effect, we need to control every pixel on the screen one by one. In this mission, you'll learn to use the powerful "for" loop, a tool designed specifically for counting and repeating actions an exact number of times. Get ready to give your switch a cinematic touch!
Level Intermediate
What will we do?
Are you a teacher?
Courses
- Grades 6-12
Materials
- Cell phone, tablet, or computer
- Internet connection
- Cardboard, scissors and a couple of rubber bands to hold the phone against the cardboard
Description
This activity introduces the "for" loop as a fundamental tool for counted iteration. Students replace an instant on/off with a sweeping animation. This calls for nested "for" loops to travel across a 2D grid, providing a practical and visually rewarding use case for this new concept.
Educational Objectives
- Understand the structure and purpose of a "for" loop (counter variable, start, end, step).
- Use nested "for" loops to iterate over a two-dimensional data structure (a grid).
- Create a sequential animation by controlling individual elements (pixels).
- Tell the difference between a loop that repeats forever and one that repeats an exact number of times.
Start (10 minutes) - The Need to Count
- Welcome the class: "Normally a light turns on all at once. Today we're going to give it a special effect. How could we make it light up like a wave of light sweeping across the screen?"
- Pose the problem: "To pull that off, we'd have to tell the program: 'turn on the first pixel, wait; turn on the second one, wait...' and so on. Repeating that 49 times by hand would be madness!"
- Introduce the solution: "Today we'll learn a powerful new tool, the 'for' loop or 'count with', which is designed for exactly this kind of counting task. It lets us run a block of code a precise number of times."
When We Need to Count: The 'For' Loop
We've seen loops that repeat forever (repeat forever). But sometimes we need a loop to run an exact number of times. The "for" loop (in Protobject, "count with") is the perfect tool for this. It's like giving the program a very precise order: "I want you to run this code, starting the count at 1, finishing at 7, and moving up 1 at a time".
The Parts of a 'For' Loop
A "for" loop has four key parts that define its mission:
- Counter Variable: A temporary variable the loop uses to keep count (for example,
i,row,column). - Initial Value: The number where the counter variable starts counting (for example,
1). - Final Value: The number where the loop will stop (for example,
7). - Step: How much the counter variable adds (or subtracts) on each repetition (for example,
1).
Nested Loops for 2D Grids
Our LED screen is a two-dimensional (2D) grid: it has rows and columns. To visit every pixel, a single loop isn't enough. The solution is to use nested 'for' loops: we put one loop inside another.
- The outer loop runs through the rows (from 1 to 7): it picks one line of the grid.
- For each row, the inner loop runs through the columns, lighting up the pixel
x = columns, y = rowsas it goes. The inner variable is the one that changes fastest: it makes its 7 full laps for every value of the outer one — that's why thedrawblock runs 7 × 7 = 49 times, once for every LED.
Development (20-30 minutes) - Coding the Light Sweep
- Now that students understand what the "for" loop is for, it's time to put it to work.
- Lead them through building the power-on with nested 'for' loops instead of a simple on/off block, as detailed below. It's crucial that they understand why two loops are needed (one for the rows and one for the columns).
Closing (5-10 minutes) - Mastering the Grid
- Once everyone has their cinematic power-on effect working, reflect on the tool that made it possible.
- Start the discussion: "Look at your new loops. What does the 'rows' variable do? And the 'columns' variable? Which of the two changes faster? Why do we need two loops, one inside the other, to cover the whole screen?" Explore how changing the order or the parameters of the loops affects the animation.
Reflect
What kinds of tasks is a "for" loop ideal for, compared with a "repeat forever" loop?
Explain why we need two nested "for" loops to light up the whole screen, and not just one.
The sweep travels the grid row by row. What would you change so it travelled column by column instead? (Hint: think about which of the two loops goes on the outside and which on the inside, without touching the draw block).
When We Need to Count: The 'For' Loop
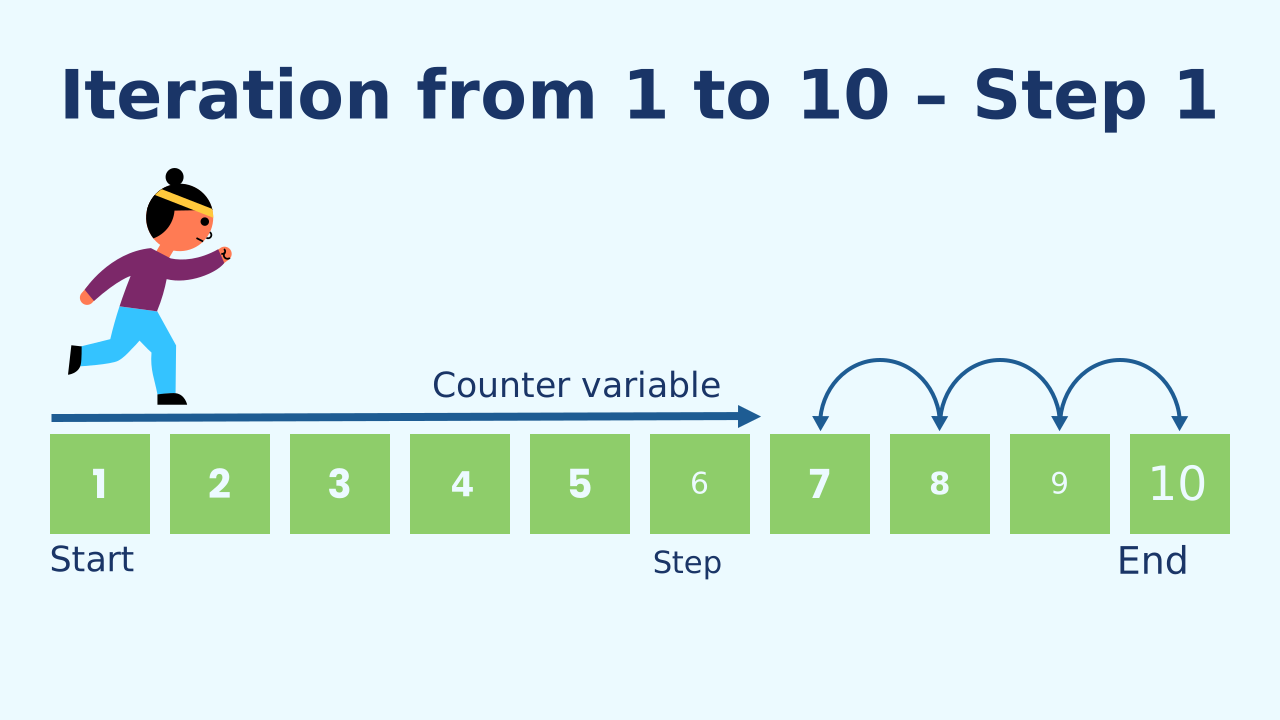
We've seen loops that repeat forever (repeat forever). But sometimes we need a loop to run an exact number of times. The "for" loop (in Protobject, "count with") is the perfect tool for this. It's like giving the program a very precise order: "I want you to run this code, starting the count at 1, finishing at 7, and moving up 1 at a time".
The Parts of a 'For' Loop
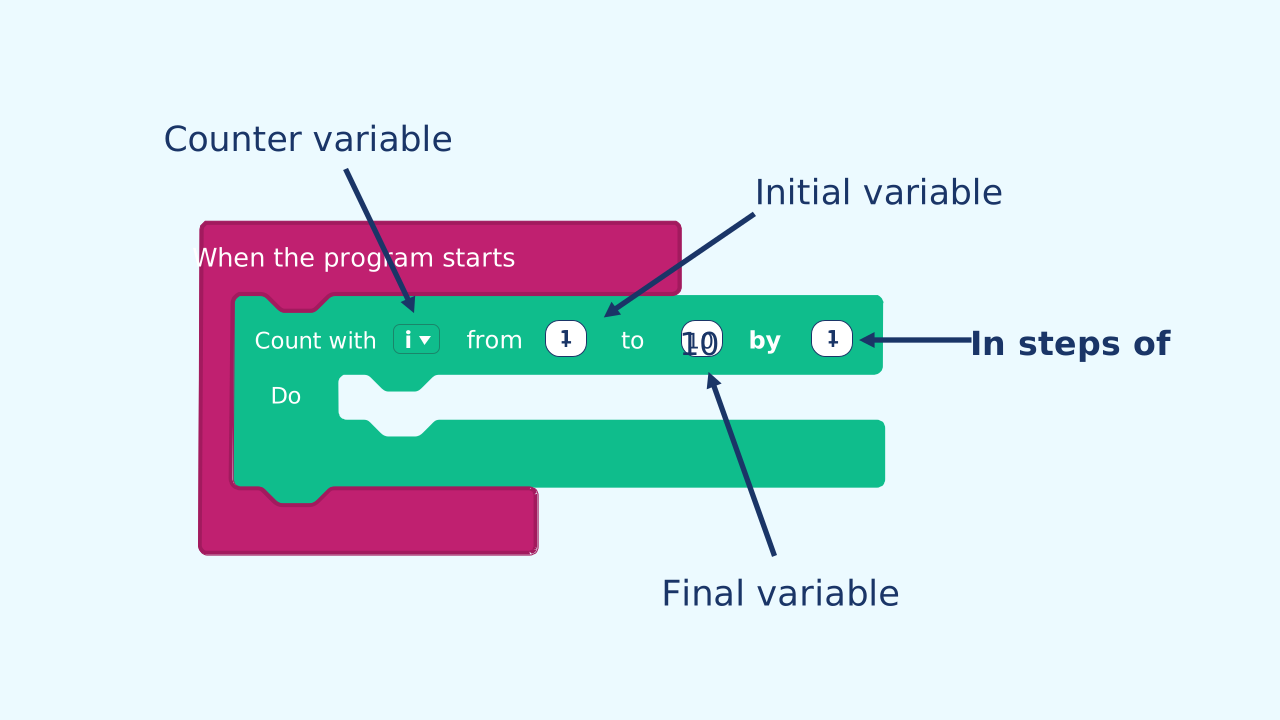
A "for" loop has four key parts that define its mission:
- Counter Variable: A temporary variable the loop uses to keep count (for example,
i,row,column). - Initial Value: The number where the counter variable starts counting (for example,
1). - Final Value: The number where the loop will stop (for example,
7). - Step: How much the counter variable adds (or subtracts) on each repetition (for example,
1).
Nested Loops for 2D Grids
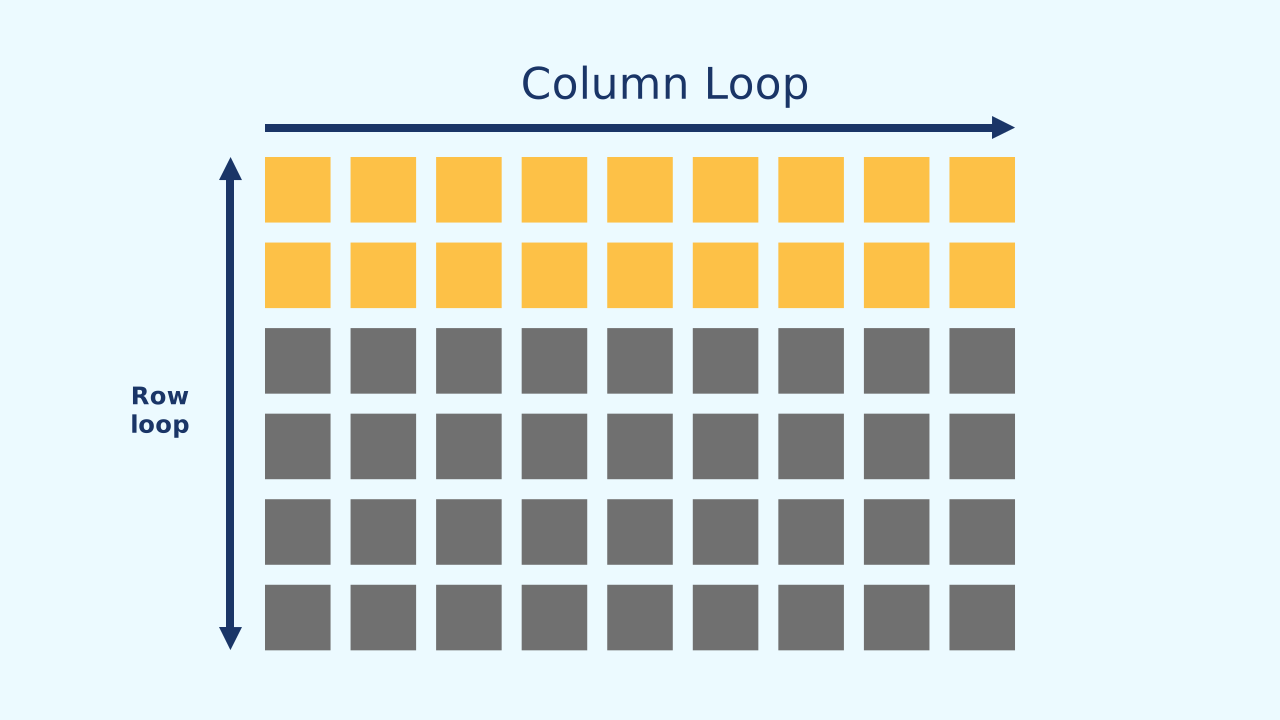
Our LED screen is a two-dimensional (2D) grid: it has rows and columns. To visit every pixel, a single loop isn't enough. The solution is to use nested 'for' loops: we put one loop inside another.
- The outer loop runs through the rows (from 1 to 7): it picks one line of the grid.
- For each row, the inner loop runs through the columns, lighting up the pixel
x = columns, y = rowsas it goes. The inner variable is the one that changes fastest: it makes its 7 full laps for every value of the outer one — that's why thedrawblock runs 7 × 7 = 49 times, once for every LED.
Create
Let's build the cinematic effect!
Build the cardboard model— you will also need a couple of rubber bands to hold the phone against the cardboard
- You'll need 2 components: NoiseLevel and LEDDraw.
- Make sure they are ready in your workspace.
We're ready to add the special effects!
Code Composition
The noise event flips the state variable from true to false and back. The big difference is inside the if... else.... When state is true, two nested count with loops run through the grid: rows on the outside and, within each row, columns, lighting up each pixel (draw on x columns y rows) with a 10-millisecond pause. In the else part we do the same thing, but we paint the pixels black to create the gradual fade-out effect.
Reflect
What kinds of tasks is a "for" loop ideal for, compared with a "repeat forever" loop?
Explain why we need two nested "for" loops to light up the whole screen, and not just one.
The sweep travels the grid row by row. What would you change so it travelled column by column instead? (Hint: think about which of the two loops goes on the outside and which on the inside, without touching the draw block).